
Branded student welcome pack for ESCP Europe:
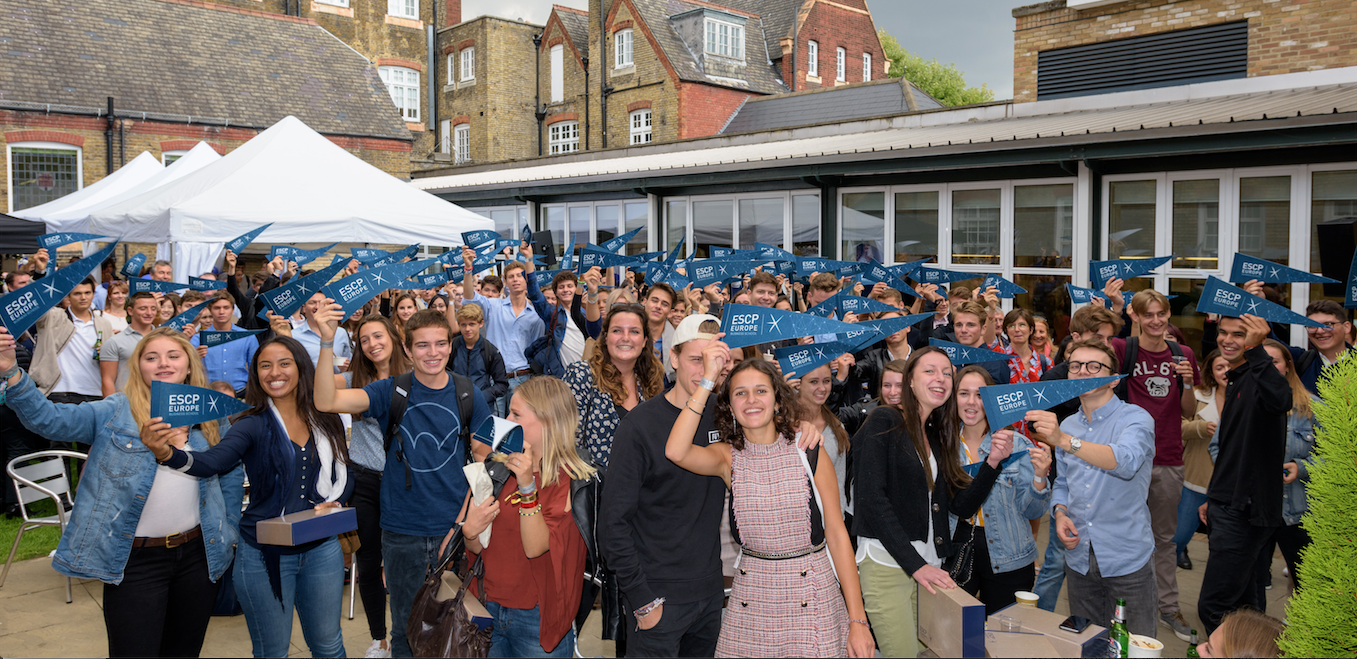
At the very end of August and in advance of the new college year, European business school ESCP Europe officially welcomed their new 2018 intake of students at a Student Welcome Event held at their London campus. Other ESCP business school locations followed suit over the following couple of weeks. These include Paris, Berlin, Madrid, Turin & Warsaw.
The event was a mixture of formal and social with the students being addressed by the Dean and various other Heads of School, followed by a reception and the opportunity to meet their fellow classmates and campus staff.
At the end of the event, all attendees were presented with a ‘student welcome pack’ – a branded presentation box containing a number of useful items the school felt would benefit the student. And, Design Inc are proud to have been involved in the strategy, design & production of these packs.
The project goes back to June when we were selected as their preferred supplier for the project. Having seen & benefited from previous creative projects, ESCP Europe felt comfortable in working with Design Inc on this project. And, they wanted a branded presentation box which would meet their goals:
– high quality, mature & stylish design
– brand consistent
– to hold the internal items securely
– be a (re)usable & user friendly product
– cost effective
– completed & delivered to both London & Paris within 8 weeks
The ten-stage approach to creating the student welcome pack.
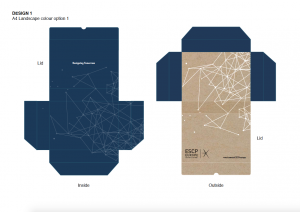
STAGE 1: BOX DESIGN CONCEPTS
Whilst, at this early stage, we did not know the exact size and dimensions of the welcome pack, our design team were still able to devise several design concepts for consideration, ranging from the more conservative style through to more creative, impactful concepts.
The selected design style showcased a ‘Galaxy’ illustration on a ‘cardboard-graphic background to provide a ‘green’ feel.
Furthermore, the presented designs included a range of different box ‘types’: some with closing flaps, separate lids, sleeves, drawers, etc. And, the solution selected was to be a self-closing flap (by use of magnets) with a cleverly constructed platform tray inside.
The chosen designs for the branded presentation box were then parked until we had the exact measurements required.
STAGE 2: GIFT PRODUCT SELECTION
Our next task was to select the gift products that would be included within the Welcome Pack / presentation box. And, the selection of these products was based upon a number of factors:
– should a common ‘theme’ to run through all the gift items? For example, should they all be associated with ‘travel’, ‘study’ or ‘social’? Moreover, should they all be technical, business or simply fun products?
– based on the budget available, should we focus on a few expensive items or many lower cost items?
– which products could be purchased & personalised in time?
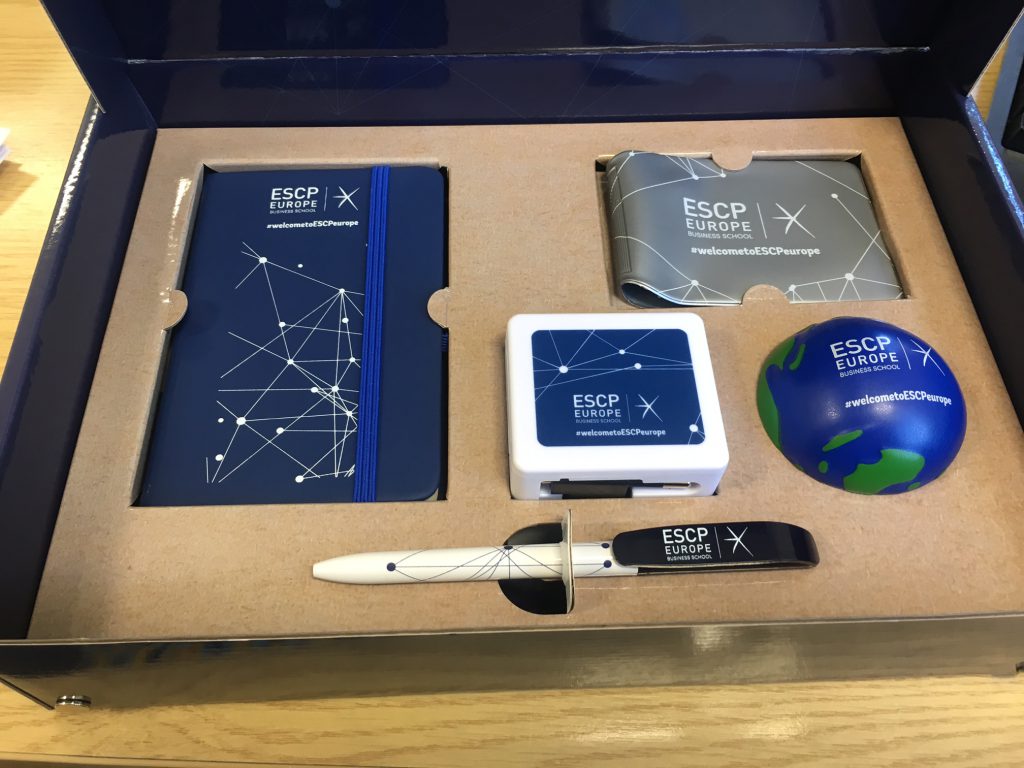
The Design Inc team proposed a number of different ‘sets’ of gift products including tea bags, coffee sachets, condoms, travel cards, pen sets, phone chargers, etc. The final selection included:
Travel Adaptor
Notepad
Pen
Oyster Card Wallet
Stress Ball
And now we had consensus on the products, we arranged to have samples supplied to us so that we can view the quality, make final selections and get exact measurements, weights, etc.
STAGE 3: GIFT DESIGN CONCEPTS
Having selected the gift products, we could start work on the designs that would eventually be printed onto each product. However, we first needed to liaise with the manufacturer of each so we could gain an understanding of the print limitations of each chosen product.
As we suspected, as all the products would come from different suppliers, they all had differing colour ranges and print capabilities and this would affect colour consistency across the range of products. For example, some products only came in certain base colours, some only allowed a one-colour print, for others it would not be possible to have an all-over print.
The information gathered allowed our creative team to devise and present suitable designs that would work well within these limited parameters. And, like the initial box designs, the products design concepts were approved but parked for future development.
STAGE 4: POSITIONING & MEASUREMENT
Once we had the products and could get exact measurements of each, we were able to formulate options for their positioning & orientation within the inner platform tray. And, as certain products could only be printed on specific areas, we needed to ensure the products were positioned to show the print face up. This would all help us when it came to the design & manufacture of the presentation box platform tray.
Some options included all five products being positioned side by side whilst other options considered product ‘hidden’ beneath others.
It was agreed to go down a position option which had all items clearly visible, side by side.
STAGE 5: PROTOTYPING
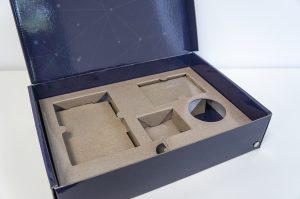
Now we could formulate the dimensions of the platform, which would then enable us to establish the exact dimensions of the box. With this knowledge, we were able to create a sample mock up of the box. We would need approval on the material, quality & strength of both the box and inner platform. Moreover, we also needed to show exactly how the platform would be engineered to hold all product items securely in place.
E Flute corrugated board was selected as the main material – primarily for its strength, durability and cost – and an unprinted sample of the box and platform were created although, for this sample, the platform was cut and assembled by hand (of course, once this would go into manufacture, this would be machine engineered).
The engineering for the platform required a number of highly effective solutions to hold the items in place: cuts, creases, holes, recesses, bases, etc and the full sample was then assembled along with the products in place and presented to the ESCP Europe board for their subsequent approval.
STAGE 6: GIFT DESIGN DEVELOPMENT
Subsequent to the client approving the box sample, we focused our attention on developing the designs that would be printed onto the gift products. Retaining the approved original concept, this stage involved ensuring the artwork was set up to the exact specifications required.
STAGE 7: PRODUCT PROCUREMENT
As we knew that the lead time for some of the products was longer than the manufacturer time of the box, the next step was to ensure all the products were ordered through the respective suppliers.
Due to time constraints, the products were arranged to be delivered directly to the client with the last product arriving at the client’s London campus a week before the boxes. This would give the client enough time to gather the gifts and assemble into the boxes. Furthermore, half the gift products were sent to Paris ready and waiting for their boxes.
STAGE 8: BOX DESIGN DEVELOPMENT
Now that the products had been ordered, we could turn our attention to developing the branded presentation box as well as the designs for the inner platform designs. And then ensuring the artwork was set up to the exact dimensions and spec required. There was no room for error here and artwork had to be precise.
The final, print-ready artwork was then released along with a precise cutter guide paper engineering of the platform.
STAGE 9: MANUFACTURE
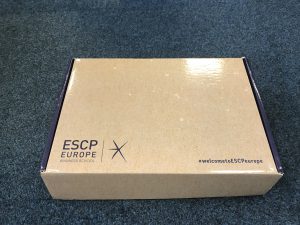
The manufacture of the welcome pack boxes and the platform was, of course, the most demanding of all the project stages. It is often at this stage that there is more scope for error but the fact we now had perfect artwork, cutter guides and had the resources in place helped minimise any risk, ensuring the manufacturing process was straightforward:
Artwork was printed 4 colour lithographically onto 170gsm Silk Paper.
Printed sheets were then gloss film laminated.
The gloss laminated sheets were then run through a Lamina mounting machine to adhere the paper to either side of the E Flute corrugated board.
Once mounted they were then fed though a crossland flat bed platen to cut them to the flat shape.
Waste was stripped away from the die cut sheet & hand assembled with inner platform tray inserted.
Dot magnets were applied for the purpose of closure.
STAGE 10: DESPATCH
Once the boxes were all complete and platforms inserted, the quantity was split evenly and despatched to two separate locations: London & Paris on a same day and 48hr delivery respectively. And, by the time the branded presentation boxes arrived in Paris, they would already have their gift products ready for fulfilment.
The whole project came together well and all the student welcome packs arrived well ahead of schedule
The London and Paris teams at ESCP Europe managed the fulfilment of the boxes themselves and were delighted to see that the gift products all fitted into their spaces with pinpoint accuracy just as we had guaranteed.
We would like to thank ESCP Europe for the opportunity to work with them on this project and we hope all their new students get great use of the products. But hopefully not so much use of the stressball!
Initial student welcome pack design
Suggested flat box layout

Initial thoughts for platform design & layout

Prototype platform sample
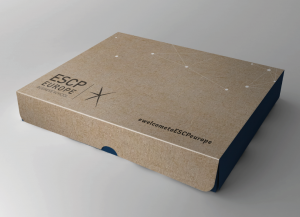
Finished box. Printed and assembled
Completed box

Gift products for each student
If you have a requirement for a student welcome pack, gift boxes or a branded presentation box, please get in contact with us on 01784 683000